Brock Rumlow, the mercenary known as Crossbones is the subject of today’s How to Paint Everything. Recently rereleased as part of the Marvel: Crisis Protocol Cabal Affiliation pack, Crossbones has broken free of core set life and looking to hammer some faces. But first, he needs some paint!
Like Red Skull, Crossbones costume is predominately black. Unlike Red Skull, Crossbones has no less than four different materials and fabrics that are black. So that’s fun. His miniature is filled with details and it’s easy to lose track of what’s what on him from table distance. For that reason, we’ll be splitting him up into four different black color schemes. We’ll steal the scheme from the Red Skull’s coat for Crossbones’ pants and shirt, we’ll also use the same scheme from Red Skull’s black leather for Crossbones’ boots, gloves, belt and gloves. This dude is covered in military webbing and enough pouches to make Liefeld swoon, we’ll make all that stuff its own color scheme and finally his helmet and knee and shin pads need to look like it’s made of either hard plastic or painted metal. That’s a lot!
So let’s get rolling on him.
Painting His Skin
Crossbones has a fair amount of skin to paint; his burly arms are bare and he has finger gloves on. Let’s assume he’s out in the sun at least a little bit and also give a nod to his MCU actor, Frank Grillo, by giving him a bit of a tan flesh tone. For this we will be using Reaper’s Tanned Skin as the basis and then use some blue and red tones to help make the skin interesting buy mixing it with Citadel’s Altdorf Blue for cool tones and Citadel’s Bugman’s Glow for some warm tones. With those down, we’ll give it a glaze of Tanned Skin mixed with Agrax Earthshade to tie them together a bit before highlighting it up.
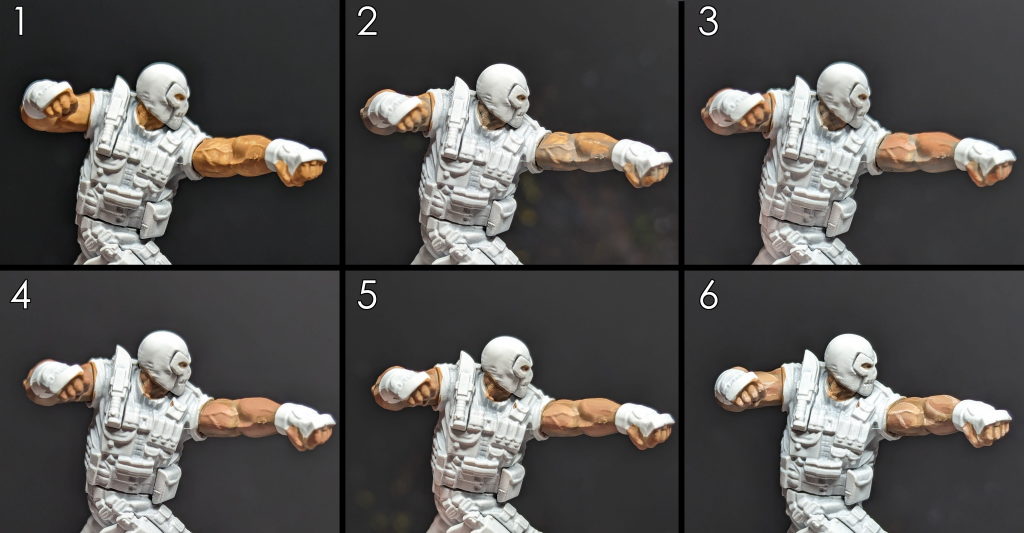
1. Basecoat: Reaper Tanned Skin
For Crossbone’s skin, we are going to start with a base coat of Reaper Tanned Skin.
2. Shadow: Reaper Tanned Skin: Altdorf Blue
Paint the recesses of his muscles, the undersides of his arms and his neck and eye holes a mixture of Tanned Skin and Altdorf Blue.
3. Layer: Reaper Tanned Skin: Citadel Bugman’s Glow
Paint the remaining areas with a mixture of Tanned Skin and Bugman’s Glow.
4. Glaze: Reaper Tanned Skin: Citadel Agrax Earthshade
Next up, we’ll mix together Tanned Skin with Agrax Earthshade and glaze it onto all of the skin.
5. Layer: Reaper Tanned Skin
Repeat the previous step, covering a slightly smaller area, but this time with straight Tanned Skin
6. Highlight: Reaper Rosey Skin
Finally, give it a slight highlight on the veins and the tops and edges of the muscles with Rosey Skin.
Painting His Clothes
We’re going to take a page out of the same book we used on Red Skull and split his clothes and tactical gear into two color groups. We’re going to start by painting his shirt and pants Vallejo Black Grey, like we did on Red Skull.
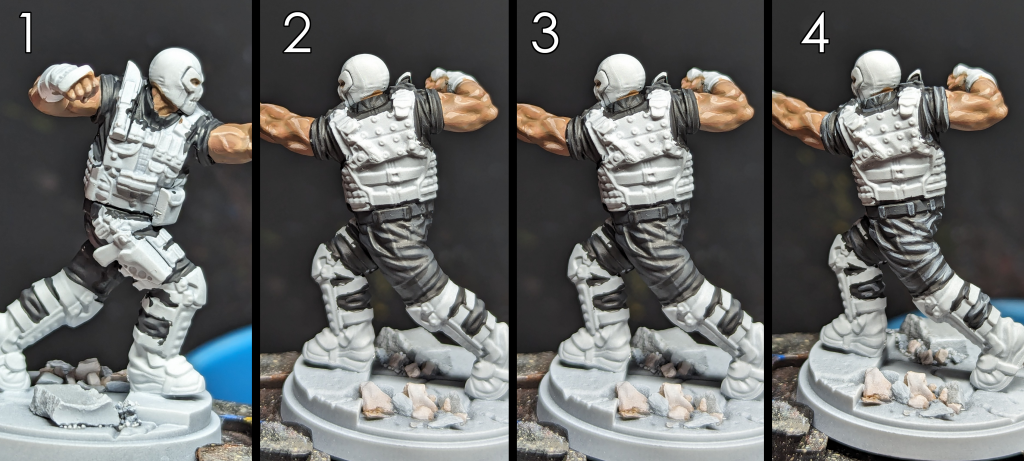
1. Basecoat: Vallejo Model Color Black Grey
We’ll start with a layer of Black Grey on pants and any visible areas of the undershirt, use thin coats until you have even coverage.
2. Shadows: Vallejo Model Color Black
I’ve painted the recesses between the folds in the fabric with Black. I could have tried to leave the recesses black during the previous step, but I feel doing it this way gives me more control over things. I also painted the areas under his arms and the underside of the sleeves black as well. follow up with Black Grey if you need to do any touch ups.
3. Highlight: Citadel Mechanicus Standard Grey
Next up, we highlight the ridges of the folds with Mechanicus Standard Grey, you can also highlight the larger smooth surfaces.
4. Edge Highlight: Citadel Administratum Grey
Finally I do a thin line and edge highlight with Administratum Grey to make the tops of and ridges in the cloth pop.
Painting the Black Leather
Once again, as with Red Skull, we’ll be using Citadel’s Incubi Darkness for a basis of the leather areas, to help differentiate the clothing from the leather. It may be hard to see the difference while everything is in progress. But trust the process, it’ll be worth it when we get to the end.

1. Basecoat: Citadel Incubi Darkness:Vallejo Model Color Black
Base coat all of the areas you want to be black leather with a rough 3:1 mix of Incubi Darkness to Black. On Crossbones, we’ll be painting his gloves, boots and belt in this mix. We want the mix to be darker than Incubi Darkness alone, but not so dark that the black overpowers it.
2. Layer: Citadel Incubi Darkness
Layer in Incubi Darkness on the edges and high points. It might take a couple coats to get it where you want it, but you should def see the color starting to build up on top of the previous step.
3. Highlight: Citadel Incubi Darkness: Citadel Phalanx Yellow
We’ll next mix in a tiny amount of Phalanx Yellow to the Incubi Darkness to lighten it up. Start highlighting the edges with this mix. Give it a few passes if needed.
4. Edge Highlight: Citadel Uthuan Grey
Finally we’ll do a few spot and edge highlights with Uthuan Grey.
Painting the Tactical Gear
Most of the remaining gear on him is a mixture of tactical webbing, pouches, holsters and armor. We’ll be base coating this with black and then using Dark Reaper mixed in to give this its own look as well, further differentiating the various black tones.
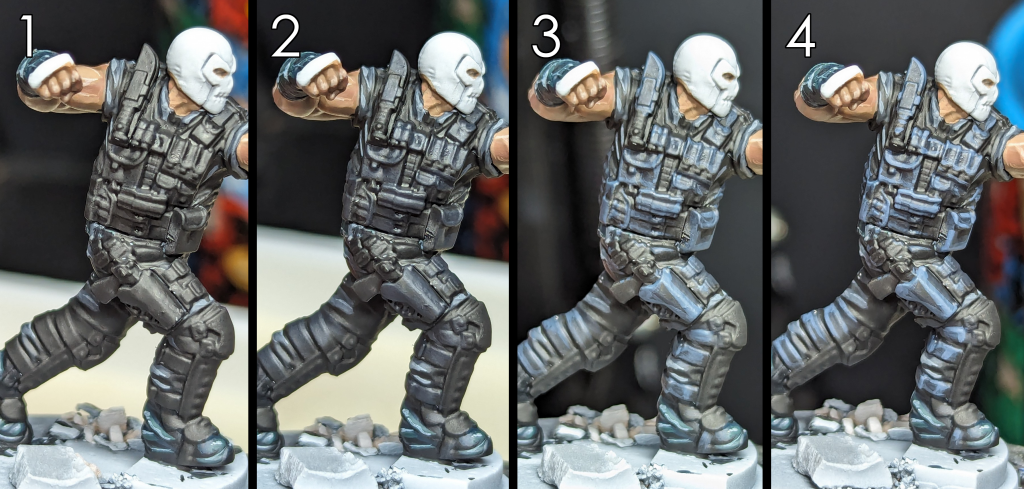
1. Basecoat: Vallejo Model Color Black
Next up we’ll base coat all of the tactical gear Black.
2. Layer: Vallejo Model Color Black: Citadel Dark Reaper
Layer up the belts, pouches and armor padding with Dark Reaper and Black mixed together
3. Edge Highlight: Citadel Dark Reaper
Highlight the edges of all of the gear with Dark Reaper
4. Edge Highlight: Vallejo Luftwaffe Uniform WWII
Do one more pass of edge highlights with Luftwaffe Uniform WWII
Painting the Helmet and Armor Plating
Are you tired of painting black yet? Well that’s too bad, keep painting. The final black sections are his armor plating, knuckle plates and helmet. We’re going to go for some easy non-metallic metal black using Citadel Kantor Blue mixed with Vallejo Model Color Black for this one and its the only area where we are going to go all the way to white on the highlights, to help sell the shiny look.
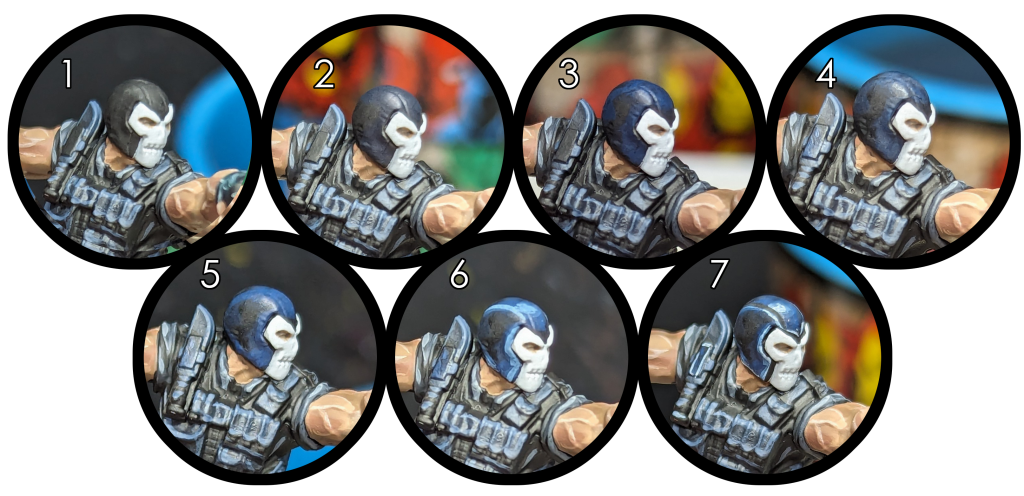
1. Basecoat: Vallejo Model Color Black
Paint the helmet, knuckles and touch up the knee pads and shin pads with Black.
2. Layer: Vallejo Model Color Black: Citadel Kantor Blue
Mix Kantor Blue and Black together trying to stay on the blue side of things, without getting too dark. Paint this mix onto the armor to create the basis of the highlights.
3. Layer: Citadel Kantor Blue
Reinforce the previous highlight layer with Kantor Blue.
4. Wash: Citadel Nuln Oil
Wash the entire area with Nuln Oil.
5. Layer: Citadel Kantor Blue
Paint Kantor Blue on top of the areas where you had previously painted Kantor Blue, leaving some of the previous layer visible.
6. Edge Highlight: Kantor Blue: Vallejo Luftwaffe Uniform WWII
Edge highlights the armor with a mix of Kantor Blue and Luftwaffe Uniform WWII, you can also add some extra highlights to the helmet to brighten up the shiny spots.
Do another pass of edge highlights with white and give the helmet highlights a final bright spot. To help add contrast to the NMM, I like to finish it off with something I call dark lining. basically paint black into the recesses and any panel lines to help break up the color a bit more.
Painting the Skull Mask
Finally we will be doing a super quick paint job on his mask using Adminstratum Grey, White and Black. We’ll use Administratum Grey to paint in some shadows, followed by a quick highlight pass with white and then a bit of black to pick out details.

1. Shadows: Citadel Administratum Grey
Reinforce shadows by painting Administratum Grey in the recesses and areas that should be in shadow
2. Highlight: Vallejo Model Color White
Highlight areas with white.
3. Dark Lining: Vallejo Model Color Black
Paint black info the mouth, around the eye sockets and in the nose hole, if needed touch up black lining around the skull mask too.
4. Touch Up: Vallejo Model Color White
Touch up any areas with white as needed.
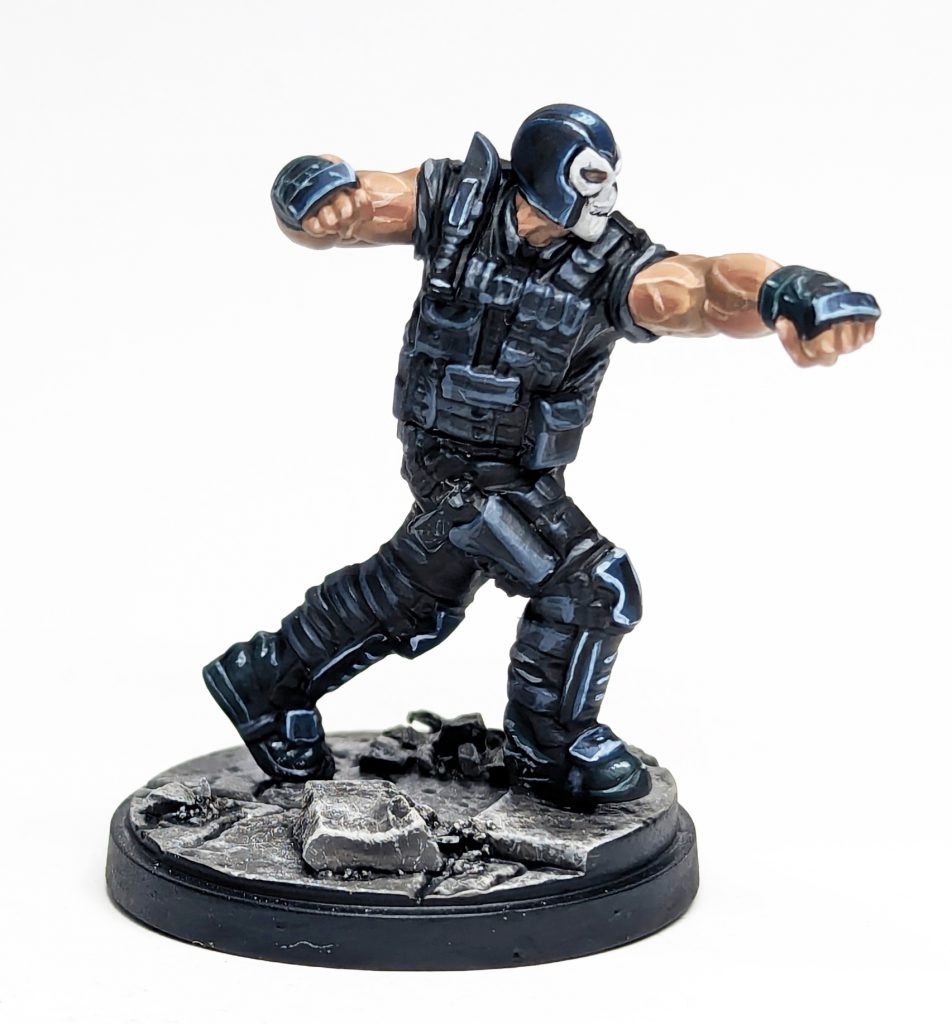
That’s basically it, Crossbones is good to go; just finish off his base as you see fit and get him punching folks on the table! Tune in next time for everyone’s favorite dancing Baron, Helumt Zemo. If you’re on social media, hit me up on Twitter/X (@brushwizard) or Instagram (@brushwizardry) and share your work, I’m always interested to see what the MCP community has been working on.
Have any questions or feedback? Drop us a note in the comments below or email us at [email protected]. Want articles like this linked in your inbox every Monday morning? Sign up for our newsletter. And don’t forget that you can support us on Patreon for backer rewards like early video content, Administratum access, an ad-free experience on our website and more.
